
[Spring] Thymeleaf 기본 사용법
1. Thymeleaf란?
Spring에서 지원하는 html 데이터 렌더링 라이브러리다.
컨트롤러에서 전달된 데이터를 사용하여 동적으로 html 페이지를 구성한다.
2. Controller
타임리프를 사용하기 위해서는 컨트롤러 먼저 구성해야 한다.
// 컨트롤러 구성 예시

import org.springframework.stereotype.Controller;
import org.springframework.web.bind.annotation.GetMapping;
import org.springframework.web.bind.annotation.RequestMapping;

@RequestMapping("/thymeleaf")
@Controller
public class Lesson05Controller {

  @GetMapping("/ex01")
  public String ex01() {
    return "thymeleaf/ex01";
  }
}
3. 변수
th:with=”a=1”
<!-- <th:block>이 안에 변수를 선언하면 div와 달리 출력 시 태그가 보이지 않는다.</th:block> -->

<h4 th:text="'<b>bold</b>'"></h4> <!-- 출력: <b>bold</b> -->
<h4 th:utext="'<b>bold</b>'"></h4> <!-- 출력: bold -->

<div th:with="number=100"> <!-- 100을 number에 담는다. -->
  <h4 th:text="${number}"></h4> <!-- 변수값 출력 (정석) -->
  <h4>[[${number}]]</h4> <!-- 간소화 -->
</div>
주의해야할 점은 변수 태그 스코프 내에 있어야 변수 사용이 가능하다.
4. 산술연산
<div th:with="number1=100, number2=30">
  <h4 th:text="'sum:' + ${number1 + number2}"></h4> <!-- 텍스트와 함께 사용 시 텍스트를 ''로 묶는다. -->
  <h4>sum: [[${number1 + number2}]]</h4> <!-- ''로 묶지 않고 텍스트 출력하는 방법 -->
  <h4 th:text="|sum: ${number1 + number2}|"></h4>
</div>
5. 조건문
th:if / th:unless
th:switch / th:case
타임리프에는 else if, else와 같은 개념이 없다.
타임리프에서 if / unless는 태그를 나타낼지, 나타내지 않을지의 조건, switch / case는 일치되는 태그를 수행한다.
5-1. if / unless
<!-- if, unless -->
<div th:with="age=30">
  <h4 th:if="${age >= 20}">성인</h4>
  <h4 th:unless="${age >= 20}">미성년자</h4>
  <!--
  unless는 거짓일 때 출력된다.
  age >= 20의 조건은 '참이므로 성인이 출력'되며 미성년자는 출력되지 않는다.
  반대로 조건이 age <= 20일 경우 '거짓이므로 미성년자가 출력'된다.
   -->
</div>
5-2. switch / case
<!-- switch, case -->
<div th:with="season=summer">
  <div th:switch="${season}">
    <h4 th:case="spring">spring</h4>
    <h4 th:case="summer">summer</h4>
    <h4 th:case="autumn">autumn</h4>
    <h4 th:case="*">winter</h4>
  </div>
</div>
<!--
출력: summer

어디에도 해당되지 않을 경우, 마지막 default 값인 winter 출력.
-->
6. 반복문
th:each=”a : ${b}”
b를 a에 담아 반복한다. (중첩 반복문과 동일)
6-1. 숫자
<!-- 숫자 반복 -->
<div th:each="value:${#numbers.sequence(0, 5)}">
[[${value}]]
</div>

<!--
출력
0
1
2
3
4
5
-->


<!-- status 추가 (두 번째 변수 명에 상태 저장) -->
<div th:each="value, status:${#numbers.sequence(16, 20)}">
  <span th:text="${value}"></span>
  status: <span th:text="${status}"></span>
  count: <span th:text="${status.count}"></span>
  index: <span th:text="${status.index}"></span>
  first: <span th:text="${status.first}"></span>
  last: <span th:text="${status.last}"></span>
</div>
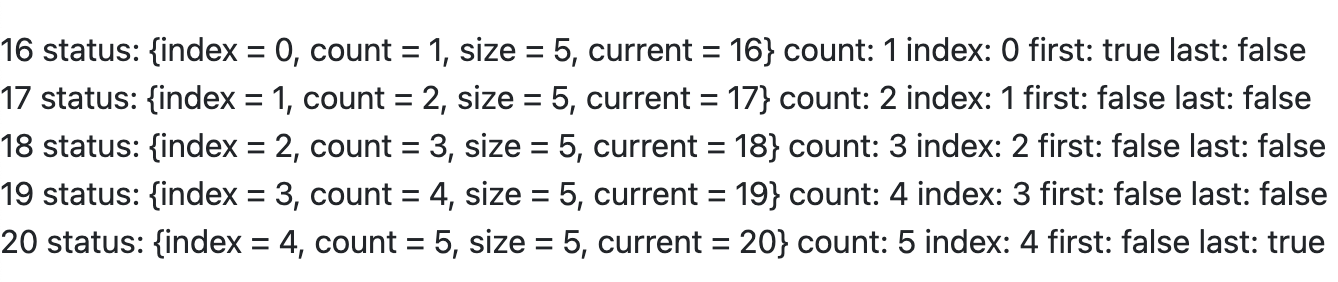
status
- index: 0부터 출력
- count: 1부터 출력
- first: 반복문이 첫번째로 돌았다면 true
- last: 반복문이 마지막일 경우 true
- current: 현재 변수 값 출력
위 메서드 외에도 IterationStatusVar에 들어가면 다양한 메서드들을 확인할 수 있다.
6-2. List
특정 값을 반복하려면 controller에 먼저 Model 객체가 있어야 한다.
이를 응용해 DB 데이터를 반복해 출력할 수 있다.
// controller
@GetMapping("/ex02")
public String ex02(Model model) {
  // 1
  List<String> fruits = new ArrayList<>(Arrays.asList("apple", "melon", "peach", "grape", "mango"));
  model.addAttribute("fruits", fruits);


  // 2
  List<Map<String, Object>> users = new ArrayList<>();
  Map<String, Object> user = new HashMap<>();
  user.put("name", "tom");
  user.put("age", 30);
  user.put("hobby", "run");
  users.add(user);

  user = new HashMap<>();
  user.put("name", "brown");
  user.put("age", 20);
  user.put("hobby", "eat");
  users.add(user);

  model.addAttribute("users", users);

  return "lesson05/ex02";
}
<!-- List 반복문 - String -->
<div th:each="fruit, status:${fruits}">
  <span th:text="${fruit}"></span>
  count: <span th:text="${status.count}"></span>
  index: <span th:text="${status.index}"></span>
</div>
<hr>

<!--
출력
apple count: 1 index: 0
melon count: 2 index: 1
peach count: 3 index: 2
grape count: 4 index: 3
mango count: 5 index: 4
-->


<!-- Map -->
<table class="table">
  <thead>
    <tr>
      <th>no</th>
      <th>name</th>
      <th>age</th>
      <th>hobby</th>
    </tr>
  </thead>
  <tbody>
    <tr th:each="user, status:${users}">
      <td th:text="${status.count}"></td>
      <td th:text="${user.name}"></td>
      <td th:text="${user.age}"></td>
      <td th:text="${user.hobby}"></td>
    </tr>
  </tbody>
</table>
Leave a comment